San Jose Cabinet Refinishing is an effective and cost-efficient alternative to replacing your cabinets. It saves you money and time while transforming your kitchen.
Before refinishing, it is important to determine if your existing finish is oil or water-based (latex). This will help you choose the best refinishing products. It also helps ensure a beautiful result.
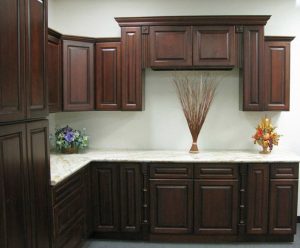
Cabinets are a vital part of the home and can make a big difference in your space. However, they can also start to look old and worn out over time. If you’re looking to revamp the appearance of your cabinets, a professional refinishing job is a smart choice. This solution is less expensive than replacing the cabinets, and it can still offer a dramatic transformation.
The process is also far faster than a full renovation, which means you’ll be able to enjoy your new kitchen sooner. Additionally, refinishing is more environmentally friendly than replacing your cabinets. It reduces waste and avoids adding more materials to landfills, making it a better choice for the environment.
If your cabinets are made of quality solid wood, refinishing them is a great way to preserve them for the long term. Refinishing will restore and enhance the natural beauty of your wood, and it can also be used to add a modern touch. For example, you could add stylish cabinet hardware to complement the refinished finish.
Refinishing is also a smart alternative if your cabinets are still structurally sound but their design is outdated. Refinishing can bring out the best in your existing cabinets, while saving you money on a costly replacement project.
The refinishing process involves carefully cleaning the surfaces, removing all of the hardware, and sanding the surface for a smooth finish. By taking the time to prepare the surfaces properly, you’ll ensure a high-quality result that lasts for years.
A professional refinishing company will use high-quality products to achieve an even and long-lasting finish. They’ll also provide a range of color options so you can find the perfect shade for your space. In addition, they’ll be able to recommend the right type of stain or paint for your cabinets.
Keep in mind that refinishing isn’t an option for cabinets made of laminate or thermofoil. It’s important to regularly inspect your cabinets for signs of wear and tear, such as chipping or scratching. If you notice any damage, it’s important to address it immediately to prevent the issue from worsening over time.
Restore the Original Appearance of Older Cabinets
Cabinet refinishing is a great option for homeowners who want to transform their kitchen without spending the money it takes to replace existing cabinets. It’s also a way to preserve the original structure and style of your cabinets, which can be particularly beneficial for homes with traditional or vintage architecture.
A good cabinet refinishing job starts with the proper cleaning and preparation of your cabinet surfaces. Use a mild cleaner designed for wood and a damp cloth or sponge to wipe away any dirt, grease, or grime that’s built up over time. This step is important for ensuring that your cabinets look their best once the new finish has dried and been sealed.
Next, your cabinet surfaces should be sanded. The goal is to create smooth, even surfaces that are ready for the new stain or paint to be applied. This is a vital step in ensuring that your new finish looks its best and lasts for years to come. Once the sanding is complete, your cabinet surfaces should be cleaned again to remove any dust or debris.
When it comes to the actual process of refinishing your cabinets, there are many options available for achieving the look you’re after. For example, you can choose a lighter shade of stain for a fresh new color or a darker stain that brings out the beauty of your wood grain. You can also add additional details like crown molding or glass door panels to give your cabinets a custom, tailored look.
In contrast, refacing involves removing the cabinet doors, drawer fronts, and hardware before applying a veneer over your existing cabinet boxes. This gives you a brand-new look with minimal effort and cost. The downside of refacing is that it can be more expensive than refinishing, but it’s still less invasive and more budget-friendly than replacing your cabinets entirely.
One of the greatest benefits of refinishing your cabinets is that it’s customizable to your personal preferences. By refinishing your cabinets, you can change the look from sleek and modern to rustic and traditional without spending a lot of money. You can also try a variety of different finishes and textures to complement your decor, from matte and satin to semi-gloss.
Less Invasive Than Full Replacement
Cabinet refinishing is a far less invasive renovation process than a full replacement. Replacing cabinets requires gutting part or all of your kitchen, a messy construction project that can leave your home out of commission for weeks or even months. Refinishing, on the other hand, involves minimal damage to your existing cabinets and only requires a few days of work, leaving you with a refreshed kitchen without the hassle of a long construction process.
Cabinets are a key feature in any kitchen and bathroom, but they can quickly become outdated or damaged over time. Professional refinishing offers homeowners the opportunity to transform their cabinets into a new style that perfectly complements their desired aesthetic, but at a fraction of the cost of replacing them entirely. In addition to the financial benefits, refinishing can also add value to your home. In fact, a recent study found that homebuyers are willing to pay up to 10% more for homes with updated kitchens.
When choosing the right refinishing service, it is important to make sure that you have a team of professionals with the proper experience to handle your project. It is also important to protect your home and furniture before beginning the refinishing process. This includes covering countertops, floors, and appliances to prevent stains or spills. You will also want to remove all of the hardware from your cabinets, including knobs and handles, so that they can be properly cleaned and degreased before being refinished. This can be done using a simple cleaner formulated for wood surfaces and a soft cloth or sponge. If your cabinets are particularly greasy, This Old House recommends trying TSP (trisodium phosphate) mixed with water to emulsify the grease and make it easier to wipe away.
While refinishing is ideal for many types of cabinets, it may not be the best option for laminate or thermofoil surfaces since they cannot be sanded or chemically stripped. Additionally, refinishing is not an appropriate option for damaged or weakened cabinets, as they can’t be strengthened with the process. In these cases, refacing would be the better choice for your kitchen or bathroom renovation needs.
Easy to Maintain
Cabinet refinishing involves keeping your existing cabinetry and simply changing the color or finish, often by hand-sanding or chemically stripping the surface, then painting or staining. This allows you to transform your kitchen without the expensive cost and messy removal process that comes with completely replacing your cabinets. It also reduces the waste of quality hardwood that would otherwise be discarded, saving natural resources and reducing your environmental footprint.
Proper cleaning and maintenance are essential for maintaining your refinished cabinets. Avoid harsh chemicals that can damage and dull the finish, and use only non-abrasive cleaners specifically designed for wood and painted surfaces. Also, dust regularly to remove buildup and prevent grime from scratching the surface over time. If your cabinets are exposed to spills or other messes, wipe them up immediately with a soft cloth to avoid damage.
Another way to update your cabinets is by replacing the hardware, such as hinges and pulls. These are easy to do and can make a big difference in the look of your kitchen. Hardware is available in a wide range of styles and materials to suit your personal style, from sleek stainless-steel handles to ornate bronze knobs. The right style of cabinet hardware can add a modern or traditional touch to your space, and can complement the colors, finishes, and details you’ve chosen for your cabinets.
If your cabinets are showing signs of aging or have serious damage, refinishing may not be an option. This process cannot fix structural issues or repair water damage, and will not provide long-lasting results if the cabinet boxes are compromised. If your cabinets are in good condition, however, refinishing can give them a fresh new look and keep them looking as beautiful as the day they were installed.
Refinishing your cabinets is a great way to update your kitchen and give your home an immediate boost in value, but it’s important to prepare properly for the project to ensure a smooth and successful transformation. By following these simple steps and avoiding common mistakes, you can make sure your cabinets look as good as new for years to come.