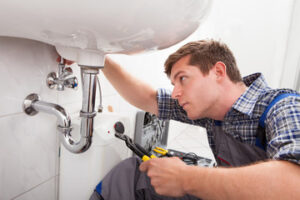
Plumbers install and repair pipes, fixtures, and appliances that provide water, heat, and waste disposal in residential and commercial buildings. They read blueprints and building codes to plan plumbing system installations, and they use specialized tools to detect and repair leaks, clogs, and other problems.
They often collaborate with other professionals, such as construction teams and architects, to ensure that plumbing systems integrate seamlessly into building projects. They also must adhere to safety protocols when working in confined spaces or on high structures. Contact Plumbers Cranford NJ for professional help.
Plumbers install and repair systems that facilitate water, gas, and waste disposal in residential, commercial, and industrial settings. They must have a wide range of skills to properly maintain these essential systems, including familiarity with multiple pipe materials and fittings; knowledge of plumbing codes and blueprints; and the ability to identify and troubleshoot issues.
One of the most common plumbing problems is leaky pipes. Leaky pipes can cause soaring water bills, extensive water damage to wood and masonry, and even mold and mildew growth. Plumbers use a variety of tools to locate and repair leaks, including specialized cameras and water detection devices.
Another common issue is clogged toilets. These can overflow, leading to a mess and potential health hazards from raw sewage. To fix a clogged toilet, a plumber may need to disassemble the fixture and remove obstructions in the pipes. This can require significant physical strength and the ability to work in tight spaces.
When a homeowner suspects a problem with their plumbing, they should turn off the water at the main shutoff valve before calling a plumber. This will prevent any further water damage and help the plumber find the source of the problem faster. Then, the plumber can take steps to repair or replace the affected components and restore full functionality to the plumbing system. It is also a good idea to clear away any clutter or items that might block access to the pipes, especially in crawlspaces and other out-of-the-way areas. This can make the job easier for both the plumber and the customer. And it can help ensure that the plumber finds all of the hidden problems that might need attention, like corroded valves or loose joints.
Disassembling the Faucet
Before beginning any disassembly, shut off the water supply at the main valve underneath the sink. This is to prevent the possibility of a sudden loss of pressure that could cause the faucet to drop and damage your cabinet or floor.
Once the water is fully off, drain the remaining water from the faucet by opening and then closing the spout a couple of times. This will help you avoid having to clean up a big mess later on.
The next step is to remove the handle. First, look for a small screw at the base of the handle. It’s often hidden behind a decorative cap or cover that can be removed with a flathead screwdriver. This will expose the handle set screw, which you can then unscrew with a regular screwdriver. Be careful not to lose this screw, as you will need it when reassembling the handle.
If the handle won’t budge, try applying some penetrating oil to the handle and wiggle it back and forth. This can sometimes help free a handle that’s been stuck for a while due to corrosion or mineral buildup.
With the handle and escutcheon out of the way, you should have unimpeded access to the large flat mounting nuts that hold the faucet body in place. These nuts are usually plastic and may be easy to loosen by hand, but you may need a pair of channel-type pliers to get them to turn counterclockwise.
If you need to replace the cartridge, be sure to bring the old one with you to the hardware store or home center to ensure that you have an exact match. You’ll also want to pick up a new washer and O-rings, if needed. Once you’ve replaced the cartridge and reassembled the handle, you can test it by turning it both ways to verify that hot and cold water flow correctly.
Repairing the Handle
Plumbers install, maintain, and repair plumbing systems in residential, commercial, and industrial settings. These systems include pipes, fixtures, and appliances that facilitate water supply, heating, cooling, and waste removal. Plumbers often collaborate with other professionals, including construction teams and engineers, to ensure that plumbing is seamlessly integrated into building projects. They also provide emergency services for leaking or burst pipes and other plumbing problems that require immediate attention.
Because of the varied nature of their job, plumbers need a wide range of skills to succeed. They must be able to troubleshoot and identify issues quickly, as well as have the physical strength and stamina to perform challenging manual labor. Plumbers must also be comfortable working with a variety of tools, including wrenches, pipe cutters, and soldering equipment. They should be familiar with building codes and regulations, and have a strong understanding of how different plumbing systems work.
To fix the problem, start by cleaning the handle and knob thoroughly. Coat the handles with baking soda, then douse them in clean water, scrubbing as you go. Rinse and dry the handles, and apply a clear coating to prevent future buildup.
To become a plumber, you typically need at least a high school diploma or equivalent and extensive on-the-job training. Many plumbers learn their trade through an apprenticeship program, which combines classroom study with hands-on experience under the supervision of a master plumber. Apprentices earn hourly wages while they learn, which allows them to advance quickly in the field.
Repairing the Seat
There are several different ways to repair seat upholstery, but the first step is to remove any soiled materials. This can be a messy job, but it is necessary to prevent the fabric from becoming weakened or ripped again. Vacuum and wipe down seats regularly to remove dirt and grime before it has a chance to cause permanent damage. In addition, spills should be treated as soon as possible to avoid stains.
Next, cut a patch of fabric to fit the size of the tear or hole in the seat cover. The fabric should be slightly larger than the area to be covered so that it is snug and comfortable. Then, apply a contact adhesive to the back of the patch and attach it to the seat cover. If the adhesive does not stick, try using a heat gun to help it set.
When the patch is dry, apply a coat of liquid leather over it. This will help to match the color and make the repair less noticeable. After the dye has dried, sand the patch with a piece of sandpaper to smooth it. Finally, seal the patch with a coat of fabric sealer to keep it looking fresh and to protect it from future wear and tear.
There are many benefits to reupholstering car seats, including eliminating an unpleasant odor, making the vehicle look newer, and increasing its value. However, if there are serious problems with the seat, such as big chunks of foam or batting falling out of the upholstery or protruding springs, it may be time to consider replacing it altogether. This can be expensive, but it will make the vehicle safer and more comfortable.
Repairing the Cylinder
Hydraulic cylinders can be very useful, but they’re also susceptible to the same problems as any other piece of equipment. A faulty piston rod seal, corroded head gland, or even misaligned load can lead to premature failure. It’s important to understand and fix these issues before they cause costly damage to the cylinder.
Tip #1: Make sure you’ve got the right tools. You’ll need wrenches, circlip pliers, screwdrivers, an emery cloth, and more depending on what kind of cylinder you’re working on. It’s best to get these in place before you start trying to disassemble the cylinder and remove the rod. Failing to do so could result in metal-to-metal contact with the cylinder bore, scratching, and other forms of damage.
Next, thoroughly clean the exterior of the cylinder housing and all components with a petroleum-based solvent. This will help you prevent dirt, grease, and oil from contaminating your repair work. It’s also a good idea to plug the hoses and port openings to avoid contamination while you work.
Once you’ve cleaned the cylinder and removed the cap, it’s time to replace the seals. Start by inspecting the rod piston seals and O rings, discarding any that are worn out or damaged, and replacing them with new ones. Then, install the rod piston seals and O rings, a new lock nut, and a cylinder end cap. Be sure to lubricate all of these components with hydraulic oil to keep them running smoothly.
One of the most common issues with hydraulic cylinders is leaks. Leaks can be quite dangerous, as they can contaminate the surrounding area and potentially expose workers to hazardous chemicals and fluids. It’s important to check for any signs of leaking hydraulic fluid, such as the presence of grease on the cylinder or visible moisture at the welds. Additionally, it’s important to address any leaks as soon as you notice them so they can be repaired before they become worse.